In my previous blog post, Power BI Embedded Walk Through Part 1 of 3 I have shown how to create a Power BI Embedded workspace collection in the Azure Portal as one of the first major steps. In this post, I will show how to get your Power BI report into the Azure Power BI Embedded workspace and get the embed details needed to set up the client side code in your web application.
To manage a workspace and upload a PBIX file, unfortunately, there isn’t a UI yet and must rely one the following options at the very least
- Create your own app with the SDK/API which may be too time-consuming for achieving simple scenarios
- Use the Power BI command line interface for managing Power BI Embedded workspace collections from https://github.com/Microsoft/PowerBI-Cli
- Use the ProvisionSample app which is a console application from Power BI Embedded – Integrate a report into a web app
I opted for the ProvisionSample app.
So, download the code from the github repository
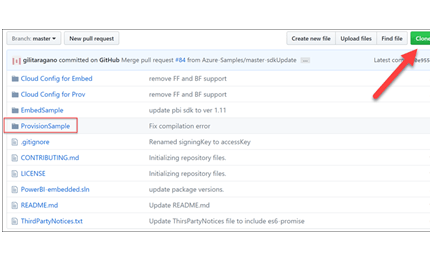
Extract the zip and open the .sln file

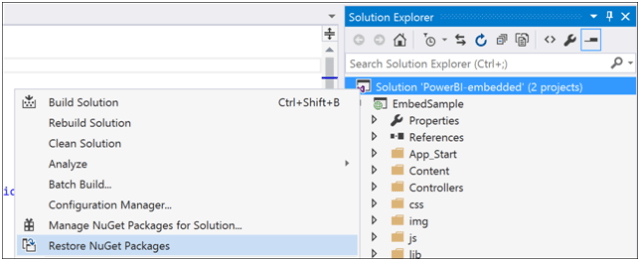
Restore the nugget packages by right clicking on the solution. Otherwise, you will get build errors.
 Open the App.config file and fill out the app settings
<appSettings file="Cloud.config">
<!-- Your Azure subscription ID -->
<add key="subscriptionId" value="" />
<!-- The Azure resource group name -->
<add key="resourceGroup" value="" />
<!-- The Power BI Workspace Collection Name -->
<add key="workspaceCollectionName" value="" />
<!-- The Power BI Workspace Collection Access Key -->
<add key="accessKey" value="" />
<!-- The Power BI Workspace-->
<add key="workspaceId" value="" />
<!-- Credentials to connect to datasource within Power BI -->
<add key="username" value="" />
<add key="password" value="" />
</appSettings>
At initial start, you can get the subscription id, resource group, workspace collection name and access key from the Azure Portal.

Get one of the Access Keys

Update the app.config file with these values
Run the ProvisionSample project in Visual Studio
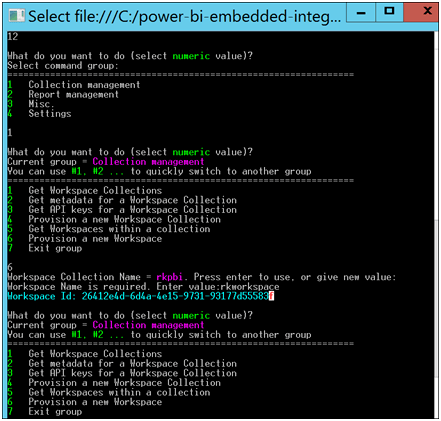
Console application loads.

We first need to create a workspace
Enter 1 to go to Collection Management
Enter 6 to Provision a new Workspace
Enter a name for the workspace
Copy the workspace Id and enter it into the app.config file. This is so that you don’t have to enter it again in the console each time you want to work in that workspace.
To import the PBIX file, enter 7 to Exit group
Enter 2 to go to Report management

Enter 3 to Import PBIX Desktop file
Press Enter to work with current workspace
Enter dataset name to skip for now
Enter the full path and file name

To get the embed details to embed the report into your app, enter 8 to generate embed details
Hit enter for default workspace collection and workspace id
For embed mode, I select 2 for Edit & Save Mode
Press enter for first report
Press enter of no row level security
Press enter to skip RLS for roles
Press Y to copy embed token to clipboard

Also, copy the Embed Url:
Embed Url: https://embedded.powerbi.com/appTokenReportEmbed?reportId=47e3e117-65b9-4bb4-8283-98525e5b7c59
In the Azure Portal, we can see workspace just created displayed

Next, we will look to how to embed this report into a web application Power BI Embedded Walk Through Part 3 of 3

Pingback: Power BI Embedded Walk Through Part 3 of 3 – Roy Kim on SharePoint, Azure, BI, Office 365
Pingback: Power BI Embedded Walk Through Part 1 of 3 – Roy Kim on SharePoint, Azure, BI, Office 365