Blog Series:
- Creating Azure Data Lake
- PowerShell and Options to upload data to Azure Data Lake Store
- Using Azure Data Lake Store .NET SDK to Upload Files
- Creating Azure Data Analytics
- Azure Data Lake Analytics: Database and Tables
- Azure Data Lake Analytics: Populating & Querying Tables
- Azure Data Lake Analytics: How To Extract JSON Files
- Azure Data Lake Analytics: U-SQL C# Programmability
- Azure Data Lake Analytics: Job Execution Time and Cost
The .NET SDK is a versatile option where you can build applications that have a graphical user interface, console application or integrate an existing application to transfer files to and from Azure Data Lake Store. For initial guidance, read Get started with Azure Data Lake Store using .NET SDK
I want to show how I implemented the SDK and highlight some key points.
I wrote a console application that reads data from a data source and uploads each file to a designated folder in Azure Data Lake Store. This ran on a reoccurring schedule.
- Create new .NET console application
- Add NuGet Packages
a. Azure.Management.DataLake.Store
b. Azure.Management.DataLake.StoreUploader - Authentication
I decided on service-to-service authentication with client secret approach.
a. Go to Azure AD
b. Click on App registrations

c. Create an Azure AD App

The sign-on URL is arbitrary at this point, so I just create any dummy URL.
d. It is now listed

e. Click into to the Azure AD App to display its settings

f. Add a key name and expiration policy and click save. This will generate a key value.
 g.Remember to copy the key value and store somewhere. This will be referenced in yours .NET application.
h. Obtain the Application ID that will be referenced in yours .NET application

i. So what did we just do? We essentially create what I like to call an App Identity in Azure Active Directory. This is like a windows server service account one can create and grant permissions to certain resources to an application. - Grant permissions in Azure Data Lake Store to the rkADSAADApp Azure AD App
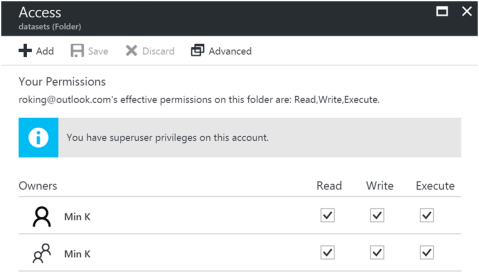
a. Go to Data Explorer
b. Click on a folder to grant permissions
Click on Access
c. Click Add > Select User or Group > Invite d. Find the rkADLSAADApp and Select
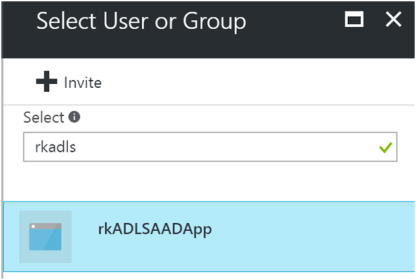
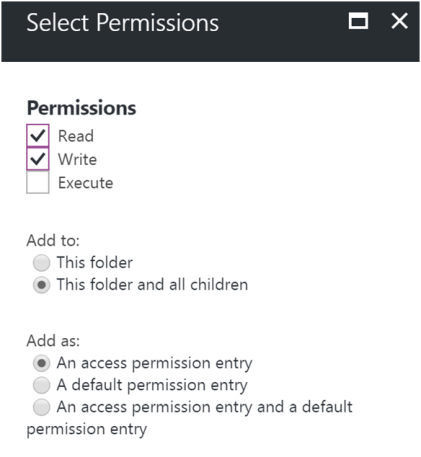
e. Select Permissions
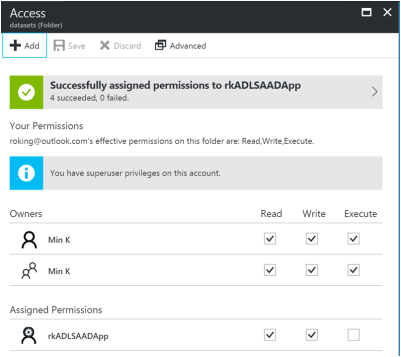
f. Confirm
- I created a .NET project called AzureDataLakeStorageDataAccess that encapsulate the file operations to Azure Data Lake Store. I adopted much of the code from samples in https://docs.microsoft.com/en-us/azure/data-lake-store/data-lake-store-get-started-net-sdkI just want to explain how I applied and designed for my own purposes.
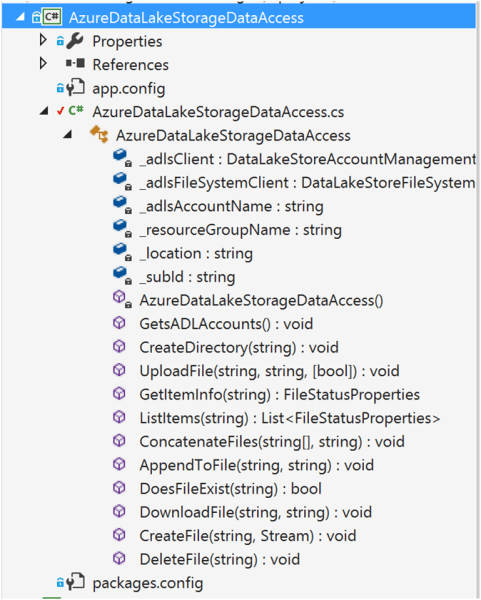
- Access and Authentication
In the constructor method, I essentially create a client context by bassing in the client credentials of an Azure AD App by the application ID and client secret.
Recommend storing these values in the app.config file and encrypt where necessary.static AzureDataLakeStorageDataAccess() { _adlsAccountName = "rkADLS"; _resourceGroupName = "rkbigdata"; _location = "Central US"; _subId = "<subscription ID>"; // Service principal / appplication authentication with client secret / key // Use the client ID and certificate of an existing AAD "Web App" application. System.Threading.SynchronizationContext.SetSynchronizationContext(new SynchronizationContext()); var domain = "<mydomain>.onmicrosoft.com"; var webApp_clientId = "e7e85dca-f056-4e08-8d79-91b95f18d203"; var clientSecret = "<client secret>"; var clientCredential = new ClientCredential(webApp_clientId, clientSecret); var creds = ApplicationTokenProvider.LoginSilentAsync(domain, clientCredential).Result; // Create client objects and set the subscription ID _adlsClient = new DataLakeStoreAccountManagementClient(creds); _adlsFileSystemClient = new DataLakeStoreFileSystemManagementClient(creds); _adlsClient.SubscriptionId = _subId; } - Upload a file from the local file path.
public static void UploadFile(string srcFilePath, string destFilePath, bool force = true) { var parameters = new UploadParameters(srcFilePath, destFilePath, _adlsAccountName, isOverwrite: force); var frontend = new DataLakeStoreFrontEndAdapter(_adlsAccountName, _adlsFileSystemClient); var uploader = new DataLakeStoreUploader(parameters, frontend); uploader.Execute(); } - Upload a file based on Stream object. This is where files are based on file stream, memory stream or other.
public static void CreateFile(string destFilePath, Stream content) // TODO: support overwrite existing file paramater { _adlsFileSystemClient.FileSystem.Create(_adlsAccountName, destFilePath, content); } - The main console application would make reference to the AzureDataLakeStorageDataAccess project. And make calls as follows. Here I have some JSON formatted data in memory and created a file based on the stream content.
jsonData = GetData();
var serializer = new JsonSerializer();

byte[] byteArray = Encoding.UTF8.GetBytes(JsonConvert.SerializeObject(jsonData, Formatting.Indented));
                    using (MemoryStream stream = new MemoryStream(byteArray))
                    {
                        // Create file each time by location and date/time
                        AzureDataLakeStorageDataAccess.CreateFile(newFileName, stream);
                        Console.WriteLine("\t \t Created file " + newFileName);
}
In summary, I have shown how I implemented a .NET console application that uses the ADLS .NET SDK, which I wrapped in its own application layer, to store files into Azure Data Lake Store. The authentication mechanism was service-to-service with registering an Azure AD App and having ADLS grant it permissions. A use case would be a re-occurring batch service to periodically get data from one source to your ADLS.

Pingback: PowerShell and Options to Upload Data to Azure Data Lake | Roy Kim on SharePoint, Azure, BI, Office 365
Pingback: Creating Azure Data Lake Analytics – Roy Kim on SharePoint, Azure, BI, Office 365
Pingback: Azure Data Lake Analytics: Populating & Querying Tables – Roy Kim on SharePoint, Azure, BI, Office 365
Pingback: Azure Data Lake Analytics: How To Extract JSON Files – Roy Kim on SharePoint, Azure, BI, Office 365
Pingback: Azure Data Lake Analytics: Database and Tables – Roy Kim on SharePoint, Azure, BI, Office 365