The previous blog post part 4, I have shown how to create Analytics rules that alert for SQL Injection attacks.
I will show the incidents that are generated from this rule to do further investigation. Your organization may have a cyber security team that will monitor, analyze and investigate incidents to evaluate threats. Incidents investigation and having the workflow to manage the lifecycle is one of the essential capabilities of a Security Incident Event Management (SIEM) system. As part of an investigation, it is assigned to an appropriate subject matter expert. And then determine the next steps, such as disregard due to a false-positive, contain the threat, quarantine, block the source of threat, document in knowledge base or more.
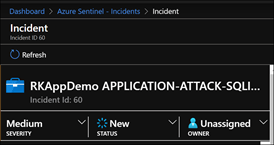
In the incidents blade, you can see a list of incidents generated by the analytics rule I have created.

- The incident item with an autogenerated incident ID. In this case 54 and some metadata properties.
- The ability to change the severity, change the status to ‘In Progress’, and assign to a specific individual. This a user account in the Azure AD directory.
- Clicking on View full details
The View full details shows 738 events and other details to help triage and understand in the incident.

By clicking into events in the two links marked with the red box, the log query will open up to see the records. One can alter the query to analyze the data further by querying for more fields, filtering and checking other date ranges. You can learn more about the Kusto query language reading https://docs.microsoft.com/en-us/azure/kusto/query/

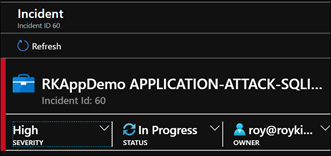
As a next step as part of triaging incidents, the incident be updated in terms of its severity level, status and assigned owner.
Currently it is
And can be updated to
As the roy@roykim.ca user, I login into portal.azure.com and visit Azure Sentinel. To setup the permissions, I did the following
- In the resource group of the log analytics workspace (i.e. rkimOMS), for adding new role assignment with contributor role to roy@roykim.ca. This is so that this user can add the existing log analytics workspace to their Azure Sentinel as a one time step. Good practice to remove this role assignment afterwards for least privilege principles.
- In the log analytics workspace (i.e. rkimOMS), add new role assignment with Azure Sentinel Responder role to roy@roykim.ca to be able to read and update incidents.
For more information on Azure Sentinel permissions, read https://docs.microsoft.com/en-us/azure/sentinel/roles
This user can see as follows and then investigate and respond to the incidents assigned.

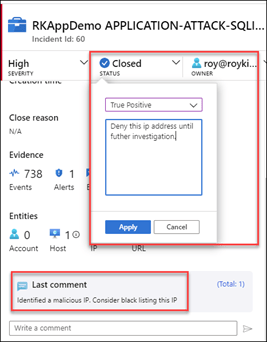
In clicking the details, the query is shown which is the same one used for the analytics rule. It shows the IP address for the client. I have redacted the IP in the screenshot for security reasons.

Knowing this IP address, the security analyst handling this incident may take further action by recommending IP restriction and denying this IP at the network firewall.
To close of this incident, I set the status as closed and add some comments.
I have shown end to end the life cycle of handling an Azure Sentinel incident.
Next we will looking at Hunting in Azure Sentinel in blog post Part 6.

Pingback: Using Azure Sentinel with Azure App Gateway to Investigate Web Attacks – Part 4 Analytics – Roy Kim on Azure, Office 365 and SharePoint
Pingback: Using Azure Sentinel with Azure App Gateway to Investigate Web Attacks – Part 6 Hunting – Roy Kim on Azure, Office 365 and SharePoint
Pingback: Using Azure Sentinel with Azure App Gateway to Investigate Web Attacks – Part 1 Intro – Roy Kim on Azure, Office 365 and SharePoint