Implementing an integration scenario with SharePoint 2013 Workflows using WaitForCustomEvent Activity in Visual Studio 2012 Technical Requirement: Integrate a SharePoint workflow with another application to call into the application and wait for a response with data.
Applicable business scenarios
- A document management approval workflow notifies a CRM system of a customer engagement and provides a reference number back to the workflow.
- A SharePoint workflow assigns and emails an end user to do some work in another application. The end user goes to the other application to do this work and it notifies the workflow of completion and other application data. The SharePoint workflow continues.
The following is an implementation flow that is applied to the above business scenario.
- The workflow instance calls an external application through a RESTful service passing correlating information and the custom wait event name.
- Workflow is in a wait state by the WaitForCustomEvent.
- The external application executes its relevant business logic and is then ready to notify the workflow through the SharePoint API by passing correlating information, event name and any event args (e.g. data).
- The workflow custom wait event handles the call and continues execution with the given event args. At this point, the workflow status can be set.


High level development
- In Visual Studio 2013
- Create a Workflow Custom Activity project item.
- Deploy solution to a site.
- In SharePoint Designer 2013
- Create a SharePoint 2013 workflow. The deployed activity will apear in the Actions menu
- Add the custom action to the workflow design surface.
- Publish workflow
Updating workflow custom activity and redeploy steps
- Create Workflow in SharePoint Designer 2013
- Clear SP Designer website cache
- Create Workflow Activity in Visual Studio 2012
- Create external application to receive and publish the even back to the running workflow instance.
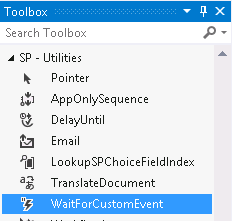
The WaitForCustomEvent Activity
This activity is part of the toolbox when you want to create a Custom Workflow Activity in Visual Studio 2012.

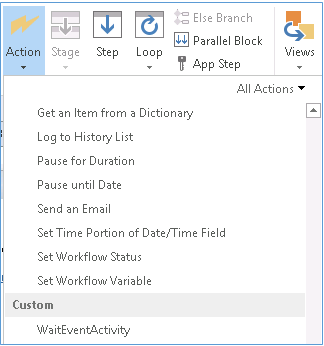
When deployed to the SharePoint server, it will show up as a custom action in SharePoint Designer 2013. This activity has an input of EventName and an output of Result.

SharePoint Client Side Object Model: WorkflowInstanceService.PublishCustomEvent
In the external application, leveraging the SharePoint Client Side Object Model, use the WorkflowInstanceService.PublishCustomEvent method to call to the waiting workflow instance to continue. This activity would handle the event is by a CSOM API call using the PublishCustomEvent method.
| Parameter | Description | Type |
| instance | The instance of a workflow that is running. | WorkflowInstance |
| eventName | The event name that would be declared in the WaitForCustomEvent activity | String |
| payload | Data that would be passed to the workflow. | String |
As you can see, the EventName input is associated to the eventName parameter and the Result output to the payload parameter. http://msdn.microsoft.com/en-us/library/microsoft.sharepoint.workflowservices.workflowinstanceservice.publishcustomevent.aspx
WorkflowServicesManager workflowServiceManager = new WorkflowServicesManager(web);
var workflowInstanceService = workflowServiceManager.GetWorkflowInstanceService();
workflowInstanceService.PublishCustomEvent(workflowInstance, "CustomEventName", "Eventpayload:value;key:value");
Sample code on the use of this method is in Sohel Blog post
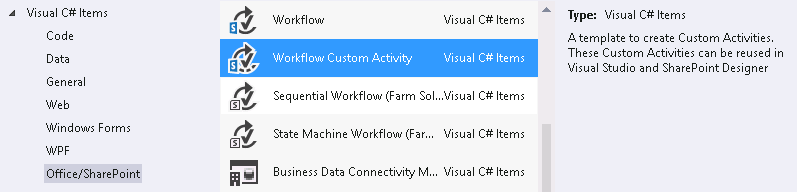
Creating the Workflow Custom Activity in Visual Studio 2012
- Create new project SharePoint 2013 – Empty Project
- Right click on the project > Add new item > Select Workflow Custom Activity

- Click on the xaml file and see the designer surface.
- Open the Toolbox pane
- Drag and drop the WaitForCustomEvent activity on to the designer surface. I have also added WriteToHistory activity for debugging/tracing purposes.

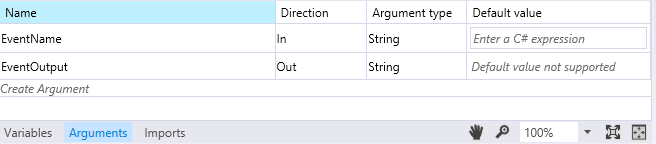
- Create arguments to make the design of this custom workflow activity dynamic and reusable in Sharepoint Designer workflows. At the bottom of the designer surface, click on the Arguments tab.

Set “EventName” as an input argument and the “EventOuput” as the output argument. To give you an idea of what we are trying to achieve by “dynamic” here is a peak of how it will be used in SharePoint Designer workflow. The following blue text are placeholders for literal values or variables.


- So now let’s get back to setting up these arguments in Visual Studio 2012. Click on the WaitForCustomEvent activity properties pane. Enter “EventName” argument for the EventName input Enter “EventOuput” argument for the Result ouput.

- Let’s surface these arguments to SharePoint Designer to look like
 Click on the .actions4 file. Setup as follows:
<Action Name="WaitEventActivity" ClassName="WaitEvent.WaitEventActivity" Category="Custom" AppliesTo="all">
  <RuleDesigner Sentence="Wait Event Name %1 ( Event Args %2 )">
    <FieldBind Field="EventName" Text="Event Name" Id="1"
    DesignerType="TextBox"
    DisplayName="Event Name triggered from an external system" />
    <FieldBind Field="EventOutput" Text="Event Output" Id="2"
    DesignerType="TextBox" DisplayName="Event ouput from an external system"   />
  </RuleDesigner>
  <Parameters>
    <Parameter Name="EventName" Type="System.String, mscorlib" Direction="Optional"
    DesignerType="TextBox"
    Description="Event Name" />
    <Parameter Name="EventOuput" Type="System.String, mscorlib" Direction="Out"
    DesignerType="TextBox"
    Description="Event Output" />
  </Parameters>
</Action>


Note: you can find more examples in the workflow15.actions4 file. These are all the out of the box actions. They are located at C:\Program Files\Common Files\microsoft shared\Web Server Extensions\15\TEMPLATE\1033\Workflow
- Deploy the solution to your SharePoint site.
This is deployed as a farm solution and activate the feature at the web scope. - Open SharePoint Designer 2013 and open the site where you had activated the feature with the WaitForCustomEvent activity.
- Create a new Workflow in 2013 workflow platform
- In the ribbon, click Action > Add the Call HTTP Web Service to make a call to the external application through a RESTful service such that the necessary business logic will be executed.
Pass correlating information and custom event name as query. This will be used to by the external application to call back to the workflow. - In the ribbon, click Action and you should see in the Custom group as defined in .actions4 file.

- Create the following workflow with using the actions Set Workflow Status, Log to History List


Creating a Mock External Application
This application will serve as a mock external system or application noted as “3” in the diagram above. This application will serve two purposes:
- Self-hosted RESTful services that wraps the business logic of which the workflow can call into. You may to choose to host in IIS web server.
- This business logic will make a call to publish a custom event notification to the running workflow instance using the SharePoint .NET Client Side Object Model.
Reference:
How to create Self-Host a Web API
http://www.asp.net/web-api/overview/hosting-aspnet-web-api/self-host-a-web-api
- Add New Project
- Select Console Application
- Right-click the Project > Manage NuGet Packages
- Install Microsoft ASP.NET Web API Self Host
- Add assembly references > browse C:\Program Files\Common Files\microsoft shared\Web Server Extensions\15\ISAPI\
- Microsoft.SharePoint.Client.WorkflowServices
- Microsoft.SharePoint.Client.Workflow
- Microsoft.SharePoint.Client.Runtime
- Create a class and method
- Create a business class with the method
PublishCustomWorkflowEvent(string url, string listTitle, string documentTitle, string eventName, string eventArgs) { using (ClientContext ctx = new ClientContext(url)) { ctx.Credentials = new NetworkCredential("\\ ", ""); // Best practice: retrive credentials in a secured credentials store. Microsoft.SharePoint.Client.WorkflowServices.WorkflowServicesManager workflowServiceManager = new Microsoft.SharePoint.Client.WorkflowServices.WorkflowServicesManager(ctx, ctx.Web); var workflowInstanceService = workflowServiceManager.GetWorkflowInstanceService(); List list = ctx.Web.Lists.GetByTitle(listTitle); int itemId = 1; CamlQuery query = new CamlQuery(); query.ViewXml =@"" + documentTitle + ""; ctx.Load(list); ctx.ExecuteQuery(); ListItemCollection listItems = list.GetItems(query); ctx.Load(listItems); ctx.ExecuteQuery(); if (listItems.Count > 0) itemId = listItems[0].Id; var workflowInstances = workflowInstanceService.EnumerateInstancesForListItem(list.Id, itemId); ctx.Load(workflowInstances); ctx.ExecuteQuery(); // Once we get the workflow Instance, we can get the instance properties as shown below. Any properties in Workflow Initiation form will also be available: if (workflowInstances.Count > 0) { foreach (WorkflowInstance instance in workflowInstances) { WorkflowStatus status = instance.Status; if (instance.Properties.Count > 0) { var itemUrl = instance.Properties["Microsoft.SharePoint.ActivationProperties.CurrentItemUrl"]; Console.WriteLine("Internal Status: " + instance.Status); Console.WriteLine(" Item Url: " + itemUrl); Console.WriteLine(" Workflow User Status: " + instance.UserStatus); string userStatus = instance.UserStatus; var propertyValue = instance.Properties["Microsoft.SharePoint.ActivationProperties.ItemId"]; workflowInstanceService.PublishCustomEvent(instance, eventName, eventArgs); Console.ForegroundColor = ConsoleColor.Magenta; Console.WriteLine("Event Args: " + eventArgs); } } // end foreach workflowInstances } } - Create a RESTful method in a controller class inherited from the APIController.
[HttpGet]
public string DoSomeWork(string url, string listTitle, string documentTitle, string eventName)
{
  string output = string.Emptyy;
  // DO SOME WORK

  // publish custom event to running workflow instance
  PublishCustomWorkflowEvent(url, listTitle, documentTitle, eventName, eventArgs);
 return output;</pre>
}

Pingback: Install Workflow Manager link | Kollipara's space
Is it possible to publish custom event without using Workflow Manager Client? Something like publishing directly to the workflow’s topic?
I guess you could if you get into the details of Workflow Manager and its Service Bus namespace. You have to understand who workflow implementations send messages to workflow’s topic and mimic that. You have to consider if MS would find this approach supportable.