Requirements & Business Scenario
- Customize Out-of-the-box (OOTB) Publishing Workflow
- Globally Reusable workflow
- Hide some Initiation form fields
- Modify the Approvers field to be more simply such that the ‘Assignment Stage’ does not show up
- Deploy workflow to be used across large site hierarchy (2 levels below root, > 30 sub sites)
About the “Publishing Approval Workflow”
The Publishing Approval workflow is the standard workflow when setting a page in the Pages Library to Publish. This workflow allows
- Setting one or more approvers in serial or parallel process
- Set Duration Unit (Day, Week, Month), Task Duration or Task Due Date
- CC someone in the workflow initiation email
- Sends emails to workflow initiator when work workflow has been initiated, to approver for an approval task, to workflow initiator on end state of the workflow (Approve, Cancel or Reject)
Walk-through Steps
1) Open SharePoint Designer
2) Open Site to the root level or your site e.g. http://server
3) Click ‘Workflows’
Here you will see out-of-the-box workflows that we can copy and modify from.
4) Select Publishing Approval Workflow
Right Click “Copy & Modify”
5) Set Name of workflow to “Custom Publishing Workflow”
6) Association and Initiation Form Parameters
The association form appears when applying a workflow template to a list. This is the initial default setup for workflows started on list items here on after.
The initiation form appears on the start up of the workflow on a list item.
The below dialog enables to set what form parameters appear on either the association, initiation or both forms. Also default values can be set.
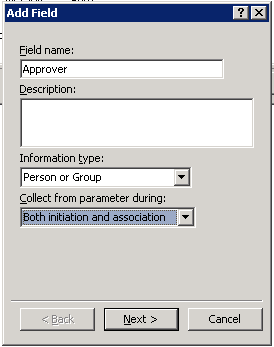
7) Add field, “Approver”
> People and Groups
> Association
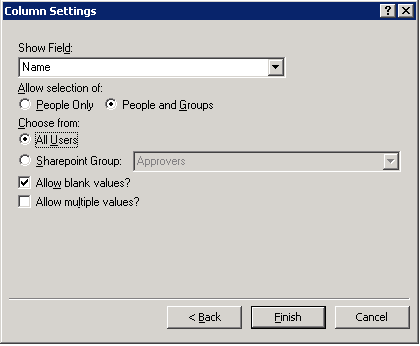
> Show Field: Name
> People & Groups
> All Users
Select “Approver Field”, Click “Move Up” so field is first field in order of the form.
8) Let’s hide the “Due Date for All Tasks” parameter. Alternatively, one can simply remove the parameter.
> Modify “Due Date for All Tasks”
> Set “Collect from Parameter during:” Association
> Next
> Set “Display Format:” Date and Time
> Finish
9) Modify “Duration Per Task”
> Set “Collect from Parameter during:” Association
> Set “Default value:” 1
> Finish
10) Modify “Duration Units”
> > Set “Collect from Parameter during:” Association
> Next
> Finish
11) Click on “Parameter: Approvers”
For field “Participants”
> click “Enter Participants Manually”
> Click “Address Book Icon”
> Select “Worfklow Lookup for a User..”
> Click “Add
>>”, Select “ Workflow variables and parameters, Select “Parameter: Approver”
> Click OK

12) Select Step 1 task
> Ribbon “Advanced Properties” or Drop Down “Properties”
> Set “Comments” Click “fx”
> Select “Parameter: Requester”
> OK
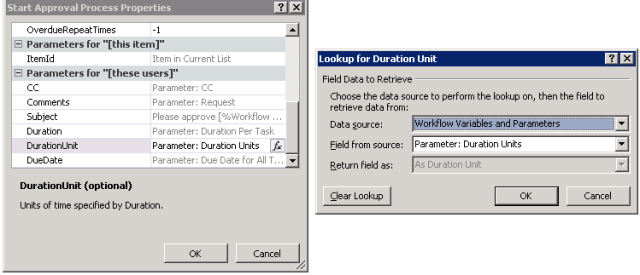
Set “DurationUnit”
> Click “fx”
> Re-Select “Parameter: Duration Units” again > OK
Note this step is required due to hiding this field in the initiation form. This step will regenerate the xml for this field to prevent workflow publishing error.
13) Save
14) Save as Template for back up purposes
15) Ribbon > Publish Globally
Deployment
Although one may “Save as Template” a custom workflow into a WSP file. The workflow is not as “portable” across SharePoint sites as one may think. For example, if you were to take your workflow as a WSP from a development environment to a test environment, install as a “User Solution” and “Publish” the workflow, the workflow will be with errors. The workflow xml definitions and Infopath forms are not fitting to the new environment. The XML (.xoml) and the Infopath forms needs to be re-generated or recreated.
After “Globally Publishing” workflows to a large site hierarchy with many sub sites, it becomes laborious to associate each and every workflow template to a list. To automate the process, a simple Feature wtih a FeatureActivating event receiver would do.
Limitations/Considerations
Notes about the concept of Reusable Workflow in SharePoint Designer
1) To have your workflow Globally Reusable, it must be made Globally Reusable from the Root Site Collection level. Within a sub site, cannot make a custom workflow and make it Globally Reusable.
2) Within a sub site, when a workflow is Globally Reusable, cannot “Copy and Modify” a workflow to make further customizations for that given sub site.
3) If you were to “Publish” a workflow in a sub site, you cannot “Publish Globally” because this operation only can happen at the root level.
The take away is that for a Globally Reusable workflow, it copied to all sub sites and cannot be modified thereafter per site.
Gotchas
1) In SharePoint Designer, removing the Duration Tasks field in the Initiation Form will cause an error when attempting to “Publish” the workflow.
Therefore, need to re-apply the Duration Tasks field in the Properties of the Action. I believe this regenerates the XML behind the workflow.


Thank you for this clear and simple walkthrough. So did you leave the ootb “approvers” parameter in there for the association and initiation forms, below the new “approver” parameter? A screenshot of the form would be nice.
Hello.
Would you mind if I share your blog with my zynga group?
There’s a lot of folks that I think would really enjoy your content. Please let me know. Cheers
Sure go ahead.
Hello, can I do this for “approval-sharePoint2010” ootb wf?
Yes
Great site. A lot of useful information here.
I’m sending it to several pals ans also sharing in delicious. And certainly, thank you to your effort!
Pretty! This has been an incredibly wonderful post.
Thanks for providing this info.
This is my first time pay a quick visit at here and i am actually pleassant to read all at
single place.
Pingback: SharePoint 2013 | Content Approval with Workflow does not update approval state | DL-UAT