
In building a python script demo in Part 3, I want to show how to package up the python script into a windows executable with command line arguments. This is so what it can be run in windows command prompt or PowerShell session.
The python packages to use is Click and Setuptools
Click is a Python package for command line interfaces. It aims to make the process of writing command line tools quick and easy.
Here is a an example of decorating the function called via command with its possible arguments. I will elaborate on this more.
@click.command()<br>@click.option("--resourcegroupname")
@click.option("--filename")
@click.option("--subscriptionid")
def create_az_storage(resourcegroupname, filename, subscriptionid):
Next to be able to build the script into an executable file that includes all its dependencies, you need Setuptools. This tools helps package your script(s) and in my scenario creates an executable file.
1) To get started with Click. First
pip install click
or add into requirements.txt and run pip install -r requirements.txt
For me I do the install of this in my virtual environment so that I have this install isolated from global workspace and any other virtual environment as a good practice.
The key code adjustments are
- Include import click at the top of the script

- Wrap the code into a function and create parameters that will be the arguments for your command

Also add lines 111-112 to allow the file to run as a script and call the function.
- Add the @Click decorators that allow the function to work with a command line interface. A decorator in Python allows a user to add new functionality to an existing object without modifying its structure. Decorators are usually called before the definition of a function.

So this allows calling the python script with the three arguments:
However, relying on the python command to run the script is not what is intended. And to run as a standalone executable command this requires Setuptools.
2) Run pip install setuptools
or add Setuptools in the requirements.txt and run pip install -r requirements.txt
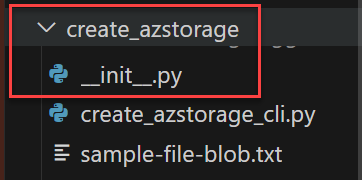
I move my script files into its own subfolder so that it can be identified as a package and create an empty __init__.py in that folder. This file is necessary to treat the directory as a Python package.
Next add a new file in the same folder called setup.py. Here is my setup file

from setuptools import setup:- Imports the
setupfunction from thesetuptoolsmodule, which is used to configure the distribution of your Python package.
- Imports the
name='create_azstorage':- Specifies the name of your Python package. This is the folder name. In this case, the package is named
create_azstorage.
- Specifies the name of your Python package. This is the folder name. In this case, the package is named
py_modules=['create_azstorage_cli']:- Specifies the Python module(s) that should be included in the distribution. In this case, it includes the module named
create_azstorage_cli. This module likely contains the Click command and associated functions.
- Specifies the Python module(s) that should be included in the distribution. In this case, it includes the module named
install_requires=[...]:- Lists the external dependencies (other Python packages) that your package requires for proper functioning. When someone installs your package using
pip, these dependencies will be automatically installed. The listed packages include Click and various Azure-related packages.
- Lists the external dependencies (other Python packages) that your package requires for proper functioning. When someone installs your package using
entry_points={...}:- Configures entry points, specifically console scripts, that are created when the package is installed. Console scripts are executable commands that can be run from the command line. In this case, it creates a console script named
create_azstorage_cli, which will call thecreate_az_storagefunction from thecreate_azstorage_climodule. 'console_scripts': Indicates that the entry points being defined are console scripts.['create_azstorage_cli = create_azstorage_cli:create_az_storage']: Specifies that running thecreate_azstorage_cliscript should execute thecreate_az_storagefunction from thecreate_azstorage_climodule.
- Configures entry points, specifically console scripts, that are created when the package is installed. Console scripts are executable commands that can be run from the command line. In this case, it creates a console script named
Next, it is ready to build into an executable.
This is done by running
pip install -e

The tail end of the console output shows
The executable is stored in the .venv\Scripts folder

I copy it to a folder that contains the sample-file-blob.txt
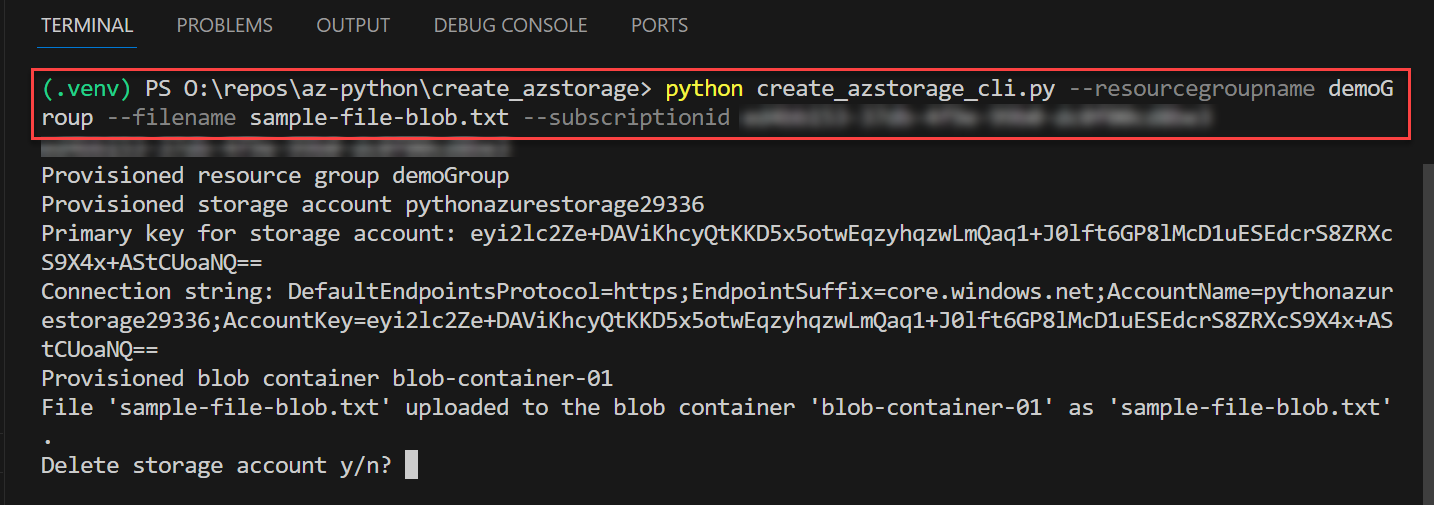
And run it.

And see the result in Azure Portal

Uploaded text file

I have shown end to end how turn a python script into a windows executable.
References:

Pingback: Step-by-Step Azure SDK for Python in Windows VS Code – Part 3 – Roy Kim on Azure and Microsoft 365
Pingback: Using GitHub Actions To Run My Python Azure Command Line Tool – Part 1 – Roy Kim on Azure and Microsoft 365